Monday, October 21, 2013

Homemade simple DELICIOUS white bread

It's taken 2 years but I finally found a really simple, really good, white bread recipe! The bread that is out there in stores is terrible! It's either full of bad ingredients or it is hard as a rock or tastes like dirt. Gross. This recipe is also universal. We have used it for pizza dough, pretzels, and bagel dogs. I will list how to do those as well.
The other reason I like this recipe so much is that it takes about half of the time that the other recipes do. Make sure you have 2 hours for this though because it doesn't turn out the same if you leave it too long. I will post some of the things that I have done to help the process as well. This is a Martha Stewart recipe adaptation.

Ingredients:
2 1/2 teaspoons of yeast or 1 packet
1/2 cup hot water plus another 3/4 of a cup
2 tablespoons melted butter plus 1 tablespoon melted butter for later.
2-3 tablespoons honey or brown sugar
2 teaspoons of salt
3-4 cups of flour (bread flour, organic flour, and artisan work best)

Use a mixer and bread hook
Not everyone's environment and oven are the same. After you've made it a few times you can play with the temperature and timing of things til you get it perfect!

Step 1: rinse your mixer bowl with hot water to heat it up. Add 1/2 cup hot water and yeast to the bowl, stir a little bit and cover with a kitchen towel for 5-10 min. It should bubble and foam and double in size. If it doesn't then something is wrong. Try adding a little more yeast and cover again.

Step 2: add 3/4 cup hot water, 2 teaspoons of salt, 2 tablespoons of honey or brown sugar, stir again and let sit for a minute or two so that the honey can melt and dissolve into the mix.

Step 3: Add a cup or two of flour and turn mixer on 1 or 2. Then add the 3 cup of flour and mix for 5 minutes. From there, add flour as needed so that the mix is not sticky but not dry. Do little bits at a time. You can also add a little more water here and there if it's too dry too. You want it to not be either sticky or dry. Let it mix for 5-10 minutes to make sure everything is incorporated evenly. You will know when the mix is ready and done right.

Step 4: in a non stick bowl (I just use my mixer bowl and spray with no stick spray), cover the bread with a towel and put it in a warm place for 1 hour. I put mine on my stove at 200 degrees. DO NOT leave it for more than an hour!  You will know probably about 15 minutes in if you need to find a warmer spot. The dough should double in size.

Step 5:  Turn oven up to 350 F. Don't use a rolling pin!! Handle the dough as little as possible and don't smash! stretch it out into a rectangle so that it is the width of your bread pan. You should be able to roll it once or twice and then tuck the ends under a little bit. Take a little melted butter and brush over the top of the loaf.

Step 6: Put loaf or loaves in the oven and set a timer for 30 minutes. At that point take tinfoil and pull out a sheet that is big enough to go under the pan and gently cover the top of the bread too. What it does is keep the bread from being too tough on the bottom or top of the loaf. Cook the bread for 15 more minutes.

Step 7: let the bread cool all the way before slicing and enjoy! It lasts about 10 days in a bread box on the counter and 14 in the fridge. If you put it in the fridge, just know that the consistency may be a little different.

Enjoy!!

If you want to use it for pizza dough, follow the same instructions except you can use a rolling pin to roll it out and it only takes 15-20 minutes to cook. It's very very good!

For pretzels, after it rises.....roll out your pretzels ( makes about 8). Boil water and slowly add 1/2 cup of baking soda to the water. SLOWLY!! Otherwise it will bubble over! Put each pretzel in for about 30 seconds. Then put on a non stick cookie sheet. You can either brush on egg wash and sprinkle with salt or just sprinkle with salt (which is what I do). Bake for 12-15 minutes. The bottom sticks a lot but don't worry about it too much. You can also add rosemary or sugar instead of salt or modify it in other ways.

For bagel dogs: do the same thing as the pretzels.....boil water and add 1/2 cup of baking soda slowly to the water. Roll dough around whatever dog you are going to use. Put it in the water for 30 seconds and put on a non stick sheet. Bake for 15 minutes! They are yummy!


Tuesday, May 21, 2013

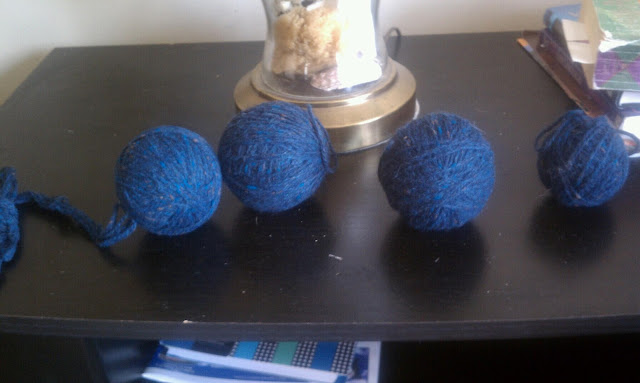
Wool dryer balls update

So I finally finished rolling the dryer balls. One skein made 3 and a half of them! I have no idea where my mom got such a large skein but I don't think its normal to get that much. Also, you can see that the one on the far side has a piece coming out. I'm not sure if its the way I rolled it or not, but its the one I made first a few weeks ago. I haven't decided if I should cut off that piece or sew it down. My concern with cutting it off is that the rest will unravel.
For those of you who don't have a knitting needle, you can sew the end down with a needle and thread. And finally, you can just use a spritz of body spray if you don't have essential oils. The oil lasts longer but if you're not sure if you'll like it you can use a cheaper form to try first. I know bath and body sells small travel size sprays as well as places like Target and Walmart too.
As far as how it works....I love it! It takes a lot less time for things to dry and it definitely helps with static and wrinkles. So far so good!

Thursday, May 9, 2013

Why I wanted to make Soap, A Lesson in Chemistry

Before I delve into how make soap, let me just say that I learned a lot and it was pretty fun! My brother came over and helped too and it was some epic brother/sister time :) Anything you can make into quality time with anyone in your life, go for it! Also, this isn't good for little kids because of the lye (a chemical that will burn you), I'll explain below.

Part of the reason I wanted to start doing some of these projects is because over the last six months my entire family, including my 16 year old cat, has had the worst allergies ever. We aren't the only ones, it was unusually bad for everyone in our area this year. I wanted to find some safer, better, cheaper cleaning products because I knew that some of the chemicals in the cleaners were contributing to the problem. So what does this have to do with soap??????
Well, with all of the surfing, swimming, and yoga (Bikram yoga, so I sweat a lot!) my skin gets very, very dry and itchy. The only brand name soap that helps is the Palmers bar soap, but it's expensive.  I have friends who have made their own soap for gifts and they also make laundry soap and other soap products too. So I decided to take a look into how to make my own soap. I figured if it was too difficult or time consuming then  I didn't have to do it again. Here are the basics that you need to know:

1. Making soap requires mixing oil and water. The only way to do this is with a chemical called lye. Lye is made by running electricity through sodium hydroxide and salt. When both the oil mixture and the lye mixture are near the same temperature, you put them together and they will fuse. Once the bonding is complete, all of the lye is gone so you don't have to worry about it any more.

2. In order to figure out how much lye you need, you need to use the lye calculator. I had no idea there was such a thing. Since all oils are different, you need to know how much of which types of oil  you are using. Put it into the calculator and it will tell you how much lye to use. https://www.thesage.com/calcs/lyecalc2.php

3.Make sure you have vinegar on hand, it neutralizes the lye in case you get it on your skin or something you didn't want it on. WEAR GOOD GLOVES! They don't have to be expensive. Even like hospital rubber gloves are fine. It's just that you want to be able to use your hands and control how much you pour of certain things on top of not burning yourself.

4. Lastly, the recipe I used has it sit for two days to solidify. Mine only took a day but I let it sit for 2 anyway. It also says that because there are no preservatives that you should try to use it within 30 days. Make a small batch unless you are giving a ton away. I am testing a batch that I put in the freezer in a ziploc bag to see if it will keep longer that way.

Recipe and directions I hope to have for you tonight!

Monday, May 6, 2013

Wool Dryer Balls and Homemade Soap

Just a quick update on this past weekends projects. I have pictures of both the wool dryer balls and the handmade soap in different stages that I will post along with each. Both turned out great up to this point. The soap has to sit covered with a towel for two days so I won't write that one probably until Wednesday this week. The dryer balls are half completed. Depending on how big you want them, the skein that I have is going to make 3 from the looks of things. Does anyone know how many inches the ones they sell are? I will measure mine too and post all of the information. I will also test drying time and static with, without, and with a dryer sheet and compare. The soap was a chemistry project for sure but it was fun and I will post everything I have because it was not easy given the directions that I had! Sorry about the delays, more on the dryer balls either tonight or tomorrow! OH! and I also tried 2 more cleaning solutions, one is a drain cleaner and the other is for pet stains. I'll post those findings too!

Saturday, April 27, 2013

creating cooking and essential oils

This weeks experiment is putting together some cooking and essential oils. Pretty basic stuff. It takes about a week so I'll post results next week, but here's how I set it up:

Cooking oils:
use olive oil or grapeseed or something with little to no smell that you cook with regularly
bruise the herbs with a mortar and pestle or another device
put herbs in a jar and cover with the oil
put the lid on and set it in a sunny window for a week.
drain the herbs out and use!
using an air tight container will make them last longer

Essential oils:
It's pretty much the same process. I'm using coconut oil and grapeseed oil.
after soaking, what you do is use a cheese cloth and squeeze the oils off of the herbs or flowers into another jar.
You'll get a small amount of concentrated product which is what you are looking for.
Great for soaps and stuff.

I made two cooking oils; ones one lemon and basil and one rosemary and lemon.
And two essential oils; one lavender and one peppermint

Results will be posted next week!

homemade household cleaners test

So last weekend was my inaugural voyage into trying some DIY projects that I saw, or heard about on pinterest or from friends or just things I wanted to try. I started with cleaning products because everyone in my houses allergies have been horrible this year.....including the dogs and cat. Chemicals can make it worse, so I started with some basic household cleaning products. Here's what I found:

Vinegar will clean and deodorize just about anything. It cuts through grease and dust fantastically. If all else fails, you can clean just about anything with it. You can also mix it with water if you want it less strong but by itself is fine.

Baking Soda: mixed with a little soap (1 cup baking soda, 2 tablespoons dish soap, few drops of essential oils is optional) makes a great paste for cleaning the bathroom. I used a sponge and a cloth. It cleans great. My only complaint is that getting the residue off was kind of a pain. If you add water to it, a little goes a long way. Use the water from a sponge after you put it on the surface you are cleaning. Don't put it in the mixture.

Baking soda by itself is a great option for cleaning the toilet. Put some in the toilet like you would the chemical mixes. Let sit for 20-30 min. Scrub and flush! Deodorizes too! This is probably one of the better ones.

Baking soda and water. Make a paste and spread on greasy stovetop. Let dry and wipe. It gets a lot of the nasty stuff off, even the stuff that's been there for years!

Ammonia- Okay, this stuff is NASTY! The grates on our stove are horribly dirty because the cleaners suck and getting the cooked on stuff off. I saw on pinterest that if you soak them in ammonia over night that it will clean it like new. They aren't kidding! But there's a catch. I would suggest doing this outside. The fumes are horrible and it is toxic nasty stuff. Make sure you have a plastic bag or container with a lid that your grates will fit in. You have to be able to completely cover it with the ammonia. It works great, but I wouldn't do this regularly. Once they are clean, you can use the baking soda mix and it will keep the newer stuff from sticking.

So far, those are the ones I've used with success.